In the ever-evolving landscape of technology and innovation, the term “Cavazaque” has started to gain traction. This guide aims to provide a comprehensive overview of Cavazaque, covering its origins, key features, applications, and potential impact on various industries.
Understanding Cavazaque
Definition and Origins
Cavazaque is a term that has emerged from the fusion of “Cavaz” and “Zaque.” The origin can be traced back to a combination of advanced technologies, including artificial intelligence, quantum computing, and blockchain. It represents a cutting-edge approach to solving complex problems by leveraging the power of these technologies in a synergistic manner.
The Fusion of Technologies
1. Artificial Intelligence (AI)
Cavazaque integrates advanced AI algorithms to enhance decision-making processes, automate tasks, and improve overall efficiency. The system is designed to learn and adapt, making it a powerful tool for various applications ranging from data analysis to autonomous systems.
2. Quantum Computing
The inclusion of quantum computing in Cavazaque enables it to perform computations at unprecedented speeds. This quantum advantage opens new possibilities for solving complex mathematical problems, especially those beyond the reach of classical computers.
3. Blockchain Technology
Cavazaque utilizes blockchain technology for secure and transparent transactions. The decentralized nature of blockchain ensures data integrity and enhances trust in the system. This is particularly crucial for applications in finance, supply chain, and healthcare.
Key Features of Cavazaque

1. Quantum Speed
One of the standout features of Cavazaque is its quantum speed. Traditional computing methods struggle with certain complex problems, but Cavazaque’s quantum capabilities enable it to handle these challenges with remarkable efficiency. This feature has broad implications for fields such as cryptography, optimization, and simulation.
2. Intelligent Decision-Making
Cavazaque’s AI integration allows it to make intelligent decisions based on vast datasets. Whether in business, healthcare, or research, the system can analyze information, identify patterns, and generate insights that would be challenging for traditional systems.
3. Security and Transparency
The use of blockchain technology ensures that transactions and data within the Cavazaque system are secure and transparent. This is particularly relevant in industries where trust and data integrity are paramount, such as finance and supply chain management.
4. Versatility in Applications
Cavazaque’s versatility makes it applicable across various industries. From optimizing logistical processes to revolutionizing healthcare diagnostics, the system’s capabilities are broad and adaptable to diverse use cases.
Applications of Cavazaque
1. Finance and Banking
In the financial sector, Cavazaque has the potential to revolutionize traditional banking processes. Its quantum speed can expedite complex calculations for risk assessment and fraud detection, while blockchain ensures secure and transparent transactions.
2. Healthcare
In healthcare, Cavazaque’s intelligent decision-making capabilities can aid in diagnostics, treatment planning, and drug discovery. The system’s ability to process and analyze vast amounts of medical data can lead to more accurate and personalized healthcare solutions.
3. Supply Chain Management
Cavazaque’s blockchain technology can be leveraged to enhance transparency and traceability in supply chain management. This is particularly valuable in industries where tracking the origin and journey of products is crucial for quality control and compliance.
4. Research and Development
The quantum computing aspect of Cavazaque holds immense potential for accelerating scientific research. Tasks that were once considered computationally infeasible can now be addressed, leading to breakthroughs in various scientific domains.
Potential Impact on Industries
1. Disruption and Innovation
The integration of Cavazaque into industries has the potential to disrupt traditional processes and catalyze innovation. As businesses adapt to the new capabilities offered by Cavazaque, they may discover novel ways to optimize operations and gain a competitive edge.
2. Increased Efficiency
Industries adopting Cavazaque can expect increased efficiency in their operations. The system’s ability to handle complex tasks with speed and precision can streamline workflows, reduce costs, and improve overall productivity.
3. Enhanced Data Security
In sectors where data security is paramount, such as finance and healthcare, Cavazaque’s blockchain technology provides an added layer of protection. The decentralized and tamper-resistant nature of blockchain ensures the integrity of sensitive information.
4. Scientific Advancements
Cavazaque’s impact on research and development could lead to scientific breakthroughs that were previously hindered by computational limitations. This has the potential to accelerate progress in fields such as materials science, physics, and chemistry.
Challenges and Considerations
1. Ethical Implications
As with any advanced technology, Cavazaque raises ethical considerations. The intelligent decision-making capabilities of the system prompt questions about accountability and responsibility, especially in applications with significant real-world consequences.
2. Integration Complexity
Integrating Cavazaque into existing systems may pose challenges, particularly for industries with established infrastructure. The complexity of merging quantum computing, AI, and blockchain requires careful planning and expertise.
3. Regulatory Frameworks
The regulatory landscape for technologies like Cavazaque is still evolving. Establishing clear and robust regulatory frameworks is essential to ensure responsible and ethical use while fostering innovation.
Conclusion
Cavazaque represents a leap forward in the convergence of quantum computing, artificial intelligence, and blockchain technology. Its potential applications across various industries signal a transformative shift in the way we approach complex problems. As businesses and researchers explore the capabilities of Cavazaque, it is essential to navigate the challenges with a focus on ethical considerations, integration strategies, and regulatory frameworks. The journey with Cavazaque is an exciting one, promising to reshape the technological landscape and unlock new possibilities for the future.
]]>I. Understanding Auto Lock and Its Purpose
Before we delve into the disabling process, it’s essential to understand the purpose of auto lock. This security feature is designed to protect your computer from unauthorized access when you are away from it. After a predefined period of inactivity, your PC will automatically lock, requiring you to enter your password or PIN to regain access. This ensures that even if you step away from your computer briefly, no one else can access your files or personal information.
II. Reasons to Disable Auto Lock
While auto lock is crucial for security, there are several valid reasons to consider disabling it temporarily or permanently:
1. Prolonged Work Sessions:
If you are engaged in a task that doesn’t require constant interaction with your PC, like reading a lengthy document or watching a video, auto lock can be intrusive.
2. Software Development and Testing:
Developers and testers often need uninterrupted access to their computers during long periods of coding, debugging, or testing.
3. Presentations and Demonstrations:
Auto lock can be an inconvenience during presentations or when demonstrating something to an audience.
4. Media Playback:
When playing music or videos on your PC, auto lock can interrupt the media and prompt you to unlock the screen.
III. Disabling Auto Lock on Windows
Windows operating system offers various methods to disable auto lock. Here are the two primary ways:
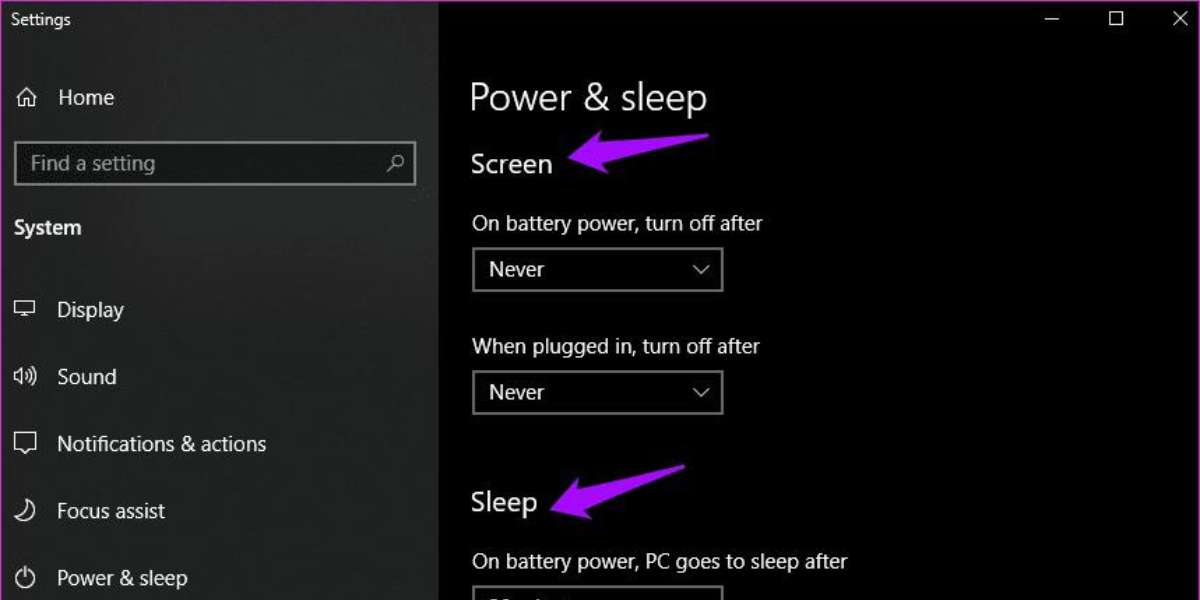
1. Changing Power & Sleep Settings:
- Click on the Start button and go to “Settings” (the gear icon).
- In the Settings window, select “System” and then click on “Power & sleep” from the left-hand sidebar.
- Under the “Screen” section, adjust the drop-down menu for “On battery power, turn off after” and “When plugged in, turn off after” to “Never.”
- Additionally, you can change the “Sleep” settings to avoid automatic sleep mode during inactivity.
2. Editing Group Policy (For Windows Pro and Enterprise Versions):
- Press “Win + R” to open the Run dialog box, then type “gpedit.msc” and hit Enter.
- In the Local Group Policy Editor, navigate to “Computer Configuration” > “Administrative Templates” > “Control Panel” > “Personalization.”
- On the right-hand side, find and double-click “Enable screen saver” to open its properties.
- Select “Disabled” and click “Apply” and then “OK.”
IV. Turning Off Auto Lock on macOS
If you’re using a Mac, you can disable the auto lock feature through the following steps:
1. Open System Preferences:
- Click on the Apple logo in the top-left corner of the screen.
- From the drop-down menu, select “System Preferences.”
2. Access Security & Privacy Settings:
- In System Preferences, click on “Security & Privacy.”
- Navigate to the “General” tab.
3. Adjust Auto Lock Settings:
- You will find the “Require password” option with a drop-down menu.
- By default, it might be set to “immediately” or a specific time duration (e.g., “5 seconds” or “1 minute”).
- Change this setting to “Off” to disable auto lock or select a longer time duration according to your preference.
V. Third-Party Software Solutions
Apart from the native settings provided by your operating system, some third-party software applications can help you manage auto lock settings more effectively. These tools often offer additional customization options and features that can enhance your PC usage experience.
How to Play Pokémon Black and White 2 on PC?
VI. The Importance of Manual Locking
While it’s useful to disable auto lock temporarily, it’s crucial to remember the importance of manually locking your computer whenever you step away from it. This simple practice ensures your PC remains protected from potential security threats, especially in public or shared environments.
VII. Security Considerations and Best Practices
As mentioned earlier, disabling auto lock should be approached with caution, as it can potentially compromise the security of your PC and sensitive data. Before deciding to turn it off, consider implementing the following security practices:
1. Enable Password Protection:
Ensure that your PC is password-protected, requiring a password or PIN to log in. This will add an extra layer of security, even if you disable auto lock temporarily.
2. Use a Screensaver Password:
Instead of completely disabling auto lock, you can set up a screensaver with a password requirement after a certain period of inactivity. This way, your PC will still lock automatically, but you can avoid frequent interruptions during specific tasks.
3. Create Separate User Accounts:
If you share your computer with others, consider setting up individual user accounts for each user. This will ensure that everyone’s data remains private and protected.
4. Encrypt Sensitive Data:
Consider encrypting sensitive files and folders on your PC to safeguard them from unauthorized access, even if someone gains physical access to your computer.
5. Lock Your PC Manually:
As mentioned earlier, develop the habit of manually locking your PC whenever you step away from it, even if auto lock is disabled. Simply pressing the “Windows key + L” on Windows or “Control + Shift + Power” on Mac will quickly lock the screen.
How to Loop a YouTube Video on PC?
VIII. Temporarily Disabling Auto Lock
If you only need to disable auto lock for a specific task or session, you can use various shortcuts and settings to achieve this without permanently altering your PC’s configuration. Here’s how you can do it:
1. On Windows:
Press the “Windows key + R” to open the Run dialog box, type “control powercfg.cpl” and press Enter. In the Power Options window, choose a power plan that keeps your PC awake (e.g., “High performance” or a custom plan), and then set the “Turn off the display” and “Put the computer to sleep” options to a longer duration or “Never.”
2. On macOS:
Press the “Control + Shift + Power” keys simultaneously to turn off the display without activating the auto lock feature. To revert to the default behavior, press any key or move the mouse.
IX. Re-enabling Auto Lock
Once you have completed your task or session, it’s essential to re-enable auto lock to maintain the security of your PC. Simply follow the steps mentioned in sections III and IV, depending on your operating system, to revert to the default auto lock settings.
X. Conclusion
Disabling auto lock on your PC can be a useful customization to improve productivity and user experience during specific tasks. However, it’s crucial to exercise caution and consider the security implications before making this change. Always ensure your PC is password-protected, and use additional security measures like screensaver passwords, separate user accounts, and data encryption to safeguard your sensitive information.
Remember that auto lock is an essential security feature designed to protect your PC from unauthorized access, and turning it off should only be done when necessary. Be mindful of your computer usage and manually lock your PC whenever you step away from it, even if auto lock is temporarily disabled. By striking the right balance between security and convenience, you can optimize your PC usage while keeping your data safe.
How Much Does a Desktop PC Weigh?
Lastly, the methods and steps provided in this article are based on the operating systems available up to September 2021. As technology evolves, the process of disabling auto lock might change or new features may be introduced. Always refer to the official documentation and support resources provided by your operating system’s manufacturer for the most up-to-date information and instructions.
]]>Step 1: Understanding Emulators and ROMs
To play Pokémon Black 2 and White 2 on your PC, you need to understand the two critical components: emulators and ROMs.
Emulators: Emulators are software applications that mimic the hardware of a gaming console, allowing you to run console games on your PC. For Pokémon Black 2 and White 2, you’ll need a Nintendo DS emulator.
ROMs: A ROM file is a digital copy of the game cartridge. It contains the game data, and you’ll need to download the ROM files for Pokémon Black 2 and White 2 to play them on your PC legally.
Step 2: Download a Nintendo DS Emulator
Start by downloading a reliable Nintendo DS emulator for your PC. Some popular emulators include DeSmuME, NO$GBA, and MelonDS. Visit the emulator’s official website or a reputable download source to obtain the emulator software.

Step 3: Download Pokémon Black 2 and White 2 ROMs
Next, search for and download the ROM files for Pokémon Black 2 and White 2. Ensure you only download ROMs from legitimate sources to avoid piracy and potential legal issues. Many websites offer ROMs for popular games, but exercise caution and verify the site’s reputation before downloading.
Step 4: Installing the Emulator
Once you’ve downloaded the emulator, locate the installation file and run the setup. Follow the on-screen instructions to install the emulator on your PC.
Step 5: Setting Up the Emulator
After the installation, launch the Nintendo DS emulator on your PC. The first time you open it, you may need to configure some settings. These settings might include graphics options, control configurations, and audio settings. Adjust these settings to suit your preferences and system capabilities.
Step 6: Loading the ROM
With the emulator set up, it’s time to load the Pokémon Black 2 or White 2 ROM. Open the emulator, go to the “File” or “Open” menu, and select the downloaded ROM file. The emulator will load the game, and you can now start playing Pokémon Black 2 or White 2 on your PC.
Step 7: Controls and Gameplay
To control the game, use your keyboard or connect a compatible controller to your PC. The emulator should allow you to map the keys or buttons to mimic the Nintendo DS controls. Familiarize yourself with the controls and enjoy the gameplay as you would on the original handheld console.
How to Loop a YouTube Video on PC?
Step 8: Saving Your Progress
In the Nintendo DS emulator, you can save your progress just like on the actual handheld device. The emulator usually provides save states and in-game saves. Save states allow you to save the game at any point and load it later, while in-game saves are similar to using the built-in save feature of the Pokémon games.
Step 9: Enhancing the Experience
To further enhance your experience while playing Pokémon Black 2 and White 2 on PC, consider the following:
Graphics Settings:
Depending on your PC’s capabilities and the emulator you’re using, you may be able to improve the graphics quality. Experiment with different settings to find the best balance between visuals and performance.
Cheats and Codes:
Some emulators allow you to use cheat codes to modify the game experience. These cheats can grant you unlimited items, rare Pokémon, or other advantages. However, using cheats may affect the integrity of your gameplay, so use them responsibly.
Controllers:
Consider using a USB controller or gamepad for a more authentic gaming experience. Many emulators support a wide range of controllers, and using one can make your gameplay more enjoyable.
Step 10: Troubleshooting and Optimizing Performance
While playing Pokémon Black 2 and White 2 on your PC can be a delightful experience, you might encounter occasional issues or performance hiccups. Here are some troubleshooting tips to help you optimize the gameplay:
- Update the Emulator: Ensure you have the latest version of the emulator installed. Developers regularly release updates to fix bugs and improve performance.
- Adjust Emulator Settings: If you encounter performance problems, experiment with different emulator settings. Lowering graphics quality or changing audio settings can often improve performance.
- Check System Requirements: Verify that your PC meets the minimum system requirements for the emulator and game. Running a resource-intensive emulator on an outdated system might lead to lag and slow gameplay.
- Graphics and Audio Plugins: Some emulators allow you to use different graphics and audio plugins for improved performance and compatibility. Research and test different plugins to find the ones that work best for your setup.
- Save Regularly: Save your progress frequently, either using the emulator’s save states or the in-game save feature. This way, you won’t lose much progress if the emulator crashes or encounters issues.
Step 11: Legal Considerations
Playing Pokémon Black 2 and White 2 on a PC using emulators and ROMs raises some legal concerns. While emulators themselves are legal, downloading copyrighted ROMs without the original game’s ownership is not. To stay on the right side of the law and support the creators, ensure you own a physical copy of the game before downloading the corresponding ROM file.
How Much Does a Desktop PC Weigh?
Step 12: Exploring Other Pokémon Games
Once you’ve relished the experience of playing Pokémon Black 2 and White 2 on your PC, you might want to explore other Pokémon games. The Nintendo DS emulator allows you to play a wide range of Pokémon titles, such as Pokémon Diamond, Pearl, HeartGold, SoulSilver, and many more. With this newfound capability, you can dive into the rich history of the Pokémon franchise and enjoy a variety of thrilling adventures.
Step 13: Connecting with the Pokémon Community
As you immerse yourself in the world of Pokémon on your PC, consider engaging with the vibrant Pokémon community. Participate in forums, social media groups, and online discussions to share your experiences, strategies, and memorable moments with fellow fans. The Pokémon community is vast, welcoming, and passionate about the games, making it an excellent place to connect with like-minded enthusiasts.
Conclusion
Playing Pokémon Black 2 and White 2 on your PC opens up a whole new world of possibilities. With the help of emulators and legally obtained ROMs, you can embark on an unforgettable journey through the Unova region, capturing Pokémon, battling trainers, and uncovering exciting secrets. Remember to follow the steps outlined in this guide to set up the emulator and game correctly, and troubleshoot any issues you may encounter. Additionally, always respect copyright laws and support the developers by owning the original games before using ROMs. Now, it’s time to relive the nostalgia and experience the magic of Pokémon on your PC. Enjoy your adventures and may you become a true Pokémon Champion!
Method 1: Using YouTube Loop Websites
One of the easiest ways to loop a YouTube video is by utilizing dedicated online loop services. Several websites cater specifically to this purpose. Follow these steps:

- Find the YouTube Video URL: Open your web browser and go to YouTube. Locate the video you wish to loop and copy its URL from the address bar.
- Visit a YouTube Loop Website: Next, search for a YouTube loop website using a search engine. Several reputable options will appear, such as “youtubeloop.net” or “infinitelooper.com.” Click on one of these websites to proceed.
- Paste the URL: Once on the loop website, you’ll find a designated box where you can paste the copied YouTube video URL. Simply right-click inside the box and select “Paste” or use the keyboard shortcut Ctrl + V (Command + V for Mac users).
- Initiate the Loop: After pasting the URL, you may find additional options, such as setting the loop to start and end at specific times. Adjust these settings according to your preferences and click on the “Loop” or “Start” button to initiate the loop.
- Enjoy the Loop: The video will now start looping, playing repeatedly until you stop it manually or close the browser tab.
Method 2: Using YouTube Repeat Feature
While YouTube doesn’t have an official loop function, it does have a built-in “repeat” feature that can be utilized to loop videos. Here’s how to do it:
- Locate the Video: Visit YouTube in your preferred web browser and find the video you want to loop.
- Modify the URL: In the address bar, add the word “repeat” immediately after the word “youtube” and before “.com.” The URL should look like “youtuberepeat.com/watch?v=yourvideocode.”
- Load the Modified URL: Press Enter to load the modified URL. The video will now play in a loop until you manually stop it.
- Bookmark the URL: To easily access the looped video in the future, bookmark the modified URL in your browser.
Method 3: Creating a YouTube Playlist
Another way to loop a YouTube video on PC is by creating a playlist containing the desired video. Follow these steps:
- Sign in to YouTube: Make sure you are signed in to your YouTube account. If you don’t have one, create an account for free.
- Add the Video to a Playlist: Find the video you want to loop and click on the “+ Save” button below the video title. From the options that appear, click on “Create new playlist.”
- Name the Playlist: Give your playlist a suitable name, such as “Looped Videos” or “Favorites.”
- Set the Playlist Privacy: You can choose to make the playlist public, private, or unlisted, depending on your preference.
- Add Video to Playlist: Click on the “Create” button to create the playlist and add the video to it.
- Access Your Playlist: Go to the YouTube homepage, click on “Library” in the left-hand sidebar, and then click on “Playlist” to find your newly created playlist.
- Enable Looping: Play the video from your playlist, right-click on the video player, and select “Loop” from the options. The video will now loop endlessly until you turn off the loop feature.
Method 4: Using Browser Extensions
For a more integrated looping experience, you can install browser extensions that add a loop functionality directly to the YouTube website. Below are the steps to do this using a popular extension like “Magic Actions for YouTube”:
- Install the Extension: Open your web browser and search for “Magic Actions for YouTube extension.” Once you find the official extension page, install it by following the provided instructions.
- Enable Loop Option: After installing the extension, open a YouTube video. Below the video player, you’ll find the Magic Actions icon (usually represented by a gear or a magic wand). Click on it to reveal a set of features.
- Activate Looping: Look for the “Loop” option among the features and toggle it on. The video will now loop continuously until you turn off the loop option.
- Explore Additional Features: Many YouTube extensions offer extra functionalities, such as cinema mode, night mode, and more. Feel free to explore and customize your YouTube viewing experience.
Method 5: Using VLC Media Player
If you prefer to watch YouTube videos offline or want more control over the looping process, you can use the VLC media player. Here’s how:
- Download VLC Media Player: If you don’t already have VLC installed on your PC, download and install it from the official website (videolan.org).
- Copy the YouTube Video URL: Open your web browser, go to YouTube, and copy the URL of the video you want to loop.
- Open VLC Media Player: Launch VLC on your computer.
- Access Media Options: In VLC, click on “Media” in the top menu and choose “Open Network Stream.”
- Paste the URL: In the “Open Media” window, paste the YouTube video URL into the provided field and click “Play.”
- Enable Looping: Once the video starts playing, right-click on the video screen, hover over “Playback,” and select “Loop” from the submenu. The video will now loop indefinitely until you disable the loop feature.
Method 6: Utilizing Browser Console Commands
For tech-savvy users familiar with browser console commands, this method offers a simple way to loop YouTube videos without any external tools or extensions. Follow these steps to loop a YouTube video using browser console commands:
How to Sync an LG Phone with Your PC?
- Open the YouTube Video: Launch your web browser and navigate to YouTube. Find the video you wish to loop and open it.
- Access Browser Console: Right-click anywhere on the YouTube page and select “Inspect” or “Inspect Element.” This will open the browser’s developer tools.
- Switch to Console Tab: In the developer tools window, find and click on the “Console” tab to access the browser’s console.
- Paste the Loop Command: In the console, paste the following command and hit Enter:
document.querySelector("video").loop = true; - Start the Video: Start playing the video by clicking on the play button or spacebar. The video will now loop indefinitely until you disable the loop manually.
- Disable Looping: If you want to stop the loop, simply reload the page or paste the following command in the console and hit Enter:
document.querySelector("video").loop = false;
Method 7: Looping YouTube Videos with Embed Code
If you plan to embed a YouTube video on your website or blog and want it to loop, you can modify the video’s embed code to achieve this. Here’s how:
- Locate the YouTube Video: Go to YouTube and find the video you want to loop.
- Click on Share: Below the video player, click on the “Share” button.
- Access Embed Options: Click on the “Embed” tab to reveal the video’s embed code.
- Customize the Embed Code: Modify the embed code by adding the
&loop=1parameter at the end of the video URL. It should look like this:https://www.youtube.com/embed/yourvideocode?&loop=1 - Copy the Modified Code: Highlight and copy the modified embed code.
- Paste the Code: Paste the modified code into your website or blog’s HTML source code. The video will now loop continuously when embedded on your page.
Method 8: Third-Party Software
If you prefer to watch YouTube videos offline and loop them from your local storage, you can use third-party software like 4K Video Downloader. Here’s how:
- Download and Install 4K Video Downloader: Visit the official website of 4K Video Downloader and download the software. Install it on your PC following the provided instructions.
- Copy the YouTube Video URL: Open your web browser, go to YouTube, and copy the URL of the video you want to loop.
- Open 4K Video Downloader: Launch the 4K Video Downloader application.
- Paste the Video URL: In 4K Video Downloader, click on the “Paste Link” button. The software will automatically detect the YouTube video from your clipboard.
- Choose Loop Option: Before starting the download, check the “Loop” option in the video’s download settings.
- Start Downloading: Click on the “Download” button to start the download process. The video will be saved to your specified location and automatically loop when played using your preferred media player.
Conclusion
Looping a YouTube video on your PC offers a convenient way to enjoy your favorite content repeatedly without manual intervention. From using online loop websites and browser extensions to creating playlists and employing browser console commands, you have various options to suit your preferences and technical expertise. Additionally, you can embed looped videos on your website or download them with third-party software for offline looping. Whichever method you choose, you can now enhance your YouTube viewing experience by effortlessly looping videos and diving deeper into the captivating world of online content. Happy looping!
]]>1. Introduction
Desktop computers have become an integral part of both work and personal life. Their processing power, graphical capabilities, and expandability make them an attractive option for a wide range of users. While laptops and smartphones are popular for their portability, desktop PCs are known for their raw power and upgradability. However, one drawback to these advantages is their weight, which can vary significantly based on the computer’s form factor, components, and materials.
2. Factors Affecting Desktop PC Weight
Several factors contribute to the weight of a desktop computer. These factors include the form factor, materials used in construction, and the components installed within the computer’s case.
2.1 Form Factor
Desktop PCs come in various form factors, each designed to cater to specific needs. The most common form factors include tower, mini-tower, all-in-one, and compact PCs. Tower PCs are usually larger and heavier due to their spacious interiors that allow for better airflow and easier component installation. Mini-tower PCs are smaller and lighter but still offer a reasonable amount of upgradability. All-in-one PCs, which integrate the computer components into the monitor, tend to be heavier than standard desktops as they house all the hardware in one unit. Compact PCs, often used for specialized purposes or as media centers, are the lightest of the desktop PC options.

2.2 Materials Used
The materials used in the construction of a desktop PC play a significant role in its overall weight. Traditional desktops often have cases made of steel or aluminum, which can add to their weight. On the other hand, compact PCs and all-in-one models may utilize more lightweight materials like plastic to reduce their overall mass.
2.3 Components Installed
The components inside a desktop PC can vary widely, depending on the user’s requirements and preferences. High-performance PCs designed for gaming or professional tasks may include powerful graphics cards, multiple storage drives, and advanced cooling solutions. These components can significantly contribute to the weight of the computer. Conversely, basic desktops with less powerful hardware will be lighter.
3. Average Weight Range of Desktop PCs
Now, let’s explore the typical weight range of different types of desktop PCs:
3.1 Tower PCs
- Standard tower PCs, commonly used for office work and general computing, usually weigh between 15 to 30 pounds (6.8 to 13.6 kilograms).
- High-performance gaming towers can range from 30 to 50 pounds (13.6 to 22.7 kilograms) due to their robust cooling systems and powerful components.
3.2 Mini-Tower PCs
Mini-tower PCs, being smaller versions of standard towers, weigh less, generally between 10 to 20 pounds (4.5 to 9 kilograms).
3.3 All-in-One PCs
All-in-one PCs combine the computer components and monitor into one unit. Their weight can range from 10 to 30 pounds (4.5 to 13.6 kilograms), depending on the screen size and internal hardware.
3.4 Compact PCs
Compact PCs, such as Intel NUC or mini-ITX builds, are the lightest among desktops, weighing around 2 to 10 pounds (0.9 to 4.5 kilograms).
4. Implications of Desktop PC Weight
The weight of a desktop PC can have several implications for users:
4.1 Portability and Transportation
- Lighter desktop PCs, like compact and mini-tower models, are easier to transport, making them suitable for users who may need to move their computers between locations regularly.
- Heavier desktops, such as high-performance gaming towers, are less portable and are better suited for stationary use.
4.2 Durability and Stability
- The weight of a desktop PC can impact its stability. Heavier computers are less likely to tip over accidentally, reducing the risk of damage to the system.
- Lighter PCs might be more susceptible to being knocked over or moved inadvertently.
4.3 Upgradability and Customization
- Heavier tower PCs usually offer more significant upgradability, as they have more internal space to accommodate additional components and larger cooling solutions.
- Compact PCs may have limited upgradability due to their smaller form factor and reduced internal space.
4.4 Thermal Management
- High-performance desktops with powerful components generate more heat, requiring better cooling solutions. Heavier towers can accommodate larger fans and heatsinks, aiding in thermal management.
- Lighter PCs might have more limited cooling options, potentially leading to higher operating temperatures.
6. Considerations When Choosing a Desktop PC
When selecting a desktop PC, it’s essential to consider your specific requirements and how the weight of the computer aligns with your needs. Here are some factors to keep in mind:
How to Sync an LG Phone with Your PC?
6.1 Intended Use
- If you plan to use your desktop PC primarily for office work, web browsing, or basic computing tasks, a standard tower or mini-tower PC may suffice. These models strike a balance between performance and weight, making them suitable for everyday use.
- Gamers and professionals working with resource-intensive applications should opt for high-performance gaming towers or custom-built PCs. Although heavier, these machines deliver the processing power required for smooth gaming experiences and complex computations.
6.2 Portability Requirements
- If you need a computer that you can easily move between different locations, such as students or business travelers, consider lightweight options like compact PCs or all-in-one models.
- On the other hand, if your desktop will remain stationary most of the time, the weight might be less of a concern, and you can prioritize other features and performance aspects.
6.3 Upgradability
- If you anticipate the need to upgrade your desktop PC in the future to keep up with advancing technology or changing requirements, a heavier tower PC is a better choice. It provides more room for additional components, ensuring a longer lifespan for your investment.
- Users who are content with their PC’s configuration and don’t plan on upgrading might find lighter and more compact models sufficient for their needs.
6.4 Space Constraints
- Consider the available space in your home or office when choosing a desktop PC. If you have limited space, a compact PC or all-in-one model can help you make the most of the available area.
- If space is not a concern, a larger tower PC can offer better thermal management, quieter operation, and a more comfortable working environment.
7. Reducing Desktop PC Weight
For users who prioritize portability or have specific weight constraints, there are some strategies to reduce the overall weight of a desktop PC:
7.1 Lightweight Materials
- Some manufacturers produce desktop PC cases using lightweight materials like carbon fiber or high-strength plastic. These materials can reduce the weight while maintaining durability.
7.2 External Components
- Consider using external components such as an external hard drive, graphics card, or optical drive when needed. This allows you to keep the primary computer lighter while connecting additional components as required.
7.3 Cloud Storage
- Utilizing cloud storage for data and files can reduce the need for large and heavy internal storage drives, especially in all-in-one PCs or compact builds with limited space for storage upgrades.
7.4 Compact Cooling Solutions
- Opt for efficient and compact cooling solutions that are specifically designed for smaller form factor PCs. These cooling systems can dissipate heat effectively without adding much weight.
8. Conclusion
The weight of a desktop PC is a crucial consideration when purchasing a computer that aligns with your specific needs and use cases. While heavier desktops offer better upgradability, thermal management, and stability, lighter options excel in portability and space-saving benefits. Your choice should be based on your intended use, portability requirements, available space, and future upgradability needs.
How to Turn On Voice Search on PC?
Remember that a well-informed decision takes into account not only the weight of the desktop PC but also its specifications, performance, and potential for future upgrades. As technology continues to advance, manufacturers will likely explore new ways to create lighter yet powerful desktop computers that cater to a wide range of users and preferences. So, take your time, do thorough research, and choose the desktop PC that best suits your computing needs and lifestyle.
]]>1. Understanding the Importance of Dust Cleaning
Before delving into the cleaning process, it’s crucial to understand why cleaning the dust from your PC is so vital. Dust acts as an insulating layer on the internal components, impeding proper airflow and causing the hardware to heat up excessively. Overheating can lead to decreased performance, system instability, and, in extreme cases, permanent damage to your valuable components.
2. Preparing for the Cleaning Process
a) Safety First:
Always prioritize safety when working with electronic devices. Turn off your PC and unplug it from the power source. This prevents accidental electric shocks and protects both you and your computer from potential harm.
b) Gather the Necessary Tools:
For a thorough cleaning, you’ll need a few tools: compressed air canister, soft brush or anti-static brush, microfiber cloths, rubbing alcohol, cotton swabs, and a screwdriver (if required to open the case).
3. External Cleaning
a) Wiping the Exterior:
Use a microfiber cloth slightly dampened with water to wipe down the external surfaces of the PC case. This helps remove visible dust, smudges, and fingerprints.
b) Cleaning the Peripherals:
Don’t forget to clean your keyboard, mouse, and monitor as well. Use compressed air to blow away dust and debris between the keys, and wipe the surfaces with a cloth dampened with rubbing alcohol.
4. Opening the PC Case
a) Check the Warranty:
If your PC is under warranty, opening the case might void it. Refer to the manufacturer’s guidelines before proceeding. If the warranty has expired, you can proceed with caution.
b) Unplug Everything:
Disconnect all cables and peripherals from the PC to avoid any accidental damage during the cleaning process.
c) Ground Yourself:
To prevent static discharge that could harm your PC components, touch a metal surface or wear an anti-static wristband before proceeding.
d) Removing the Side Panel:
Most PC cases have screws or latches holding the side panel in place. Use the appropriate screwdriver to remove the screws or release the latches to access the interior.
5. Cleaning the Internal Components
a) Identify Dust Buildup:
Once the case is open, identify areas with significant dust buildup, such as fans, heatsinks, and filters.
b) Using Compressed Air:
The most effective way to remove dust from hard-to-reach areas is by using compressed air. Hold the fans and heatsinks in place with a finger or a non-abrasive object to prevent them from spinning while blowing the dust away.
c) Brushing Technique:
For stubborn dust, utilize a soft brush or anti-static brush to dislodge the particles gently. Avoid using excessive force to prevent damage to delicate components.

d) Cleaning Filters:
If your PC has dust filters, remove them and clean them with compressed air or wash them with water (if they are washable). Allow them to dry thoroughly before reinstalling.
6. Cleaning the Motherboard and Components
a) Compressed Air for the Motherboard:
Use compressed air to clean the motherboard and other components carefully. Pay special attention to RAM slots, PCIe slots, and other connectors.
b) Cotton Swabs and Alcohol:
For tough-to-remove grime, use cotton swabs lightly dampened with rubbing alcohol. Be cautious not to leave any cotton residues behind.
How to Sync an LG Phone with Your PC?
7. Reassembling the PC
a) Wait for the Components to Dry:
If you used alcohol during cleaning, ensure that all components are thoroughly dry before reassembling the PC.
b) Putting Back Dust Filters:
Reinstall the cleaned or dried dust filters in their respective positions.
c) Closing the Case:
Align the side panel properly and secure it back in place with the screws or latches.
8. Maintaining a Dust-Free PC
a) Establish a Cleaning Schedule:
To keep your PC running smoothly, set up a regular cleaning schedule. The frequency of cleaning depends on various factors, such as your PC’s environment and usage. For most users, cleaning every three to six months should suffice, but dusty environments may require more frequent cleaning.
b) Keep the PC Elevated:
Placing your PC on a clean, elevated surface can minimize dust intake. Avoid placing it directly on the floor, where dust tends to accumulate more.

c) Use Air Filters:
If your PC case doesn’t have built-in dust filters, consider installing them. Dust filters prevent larger particles from entering the case and help reduce internal dust buildup.
d) Manage Cable Clutter:
Organize and manage your cables inside the case to improve airflow. Neatly routed cables not only enhance airflow but also make it easier to clean components without obstruction.
How to Turn On Voice Search on PC?
9. Additional Tips for a Safe Cleaning Process
a) Avoid Vacuum Cleaners:
While vacuum cleaners may seem like a good idea to remove dust, they can generate static electricity and potentially damage sensitive components. Stick to using compressed air and brushes for a safer cleaning process.
b) Mind the Temperature:
If you’re using compressed air, be cautious not to tilt the canister too much or use it excessively in one area. This can cause the canister to cool rapidly, leading to condensation that might damage your components.
c) Check Fan Direction:
After cleaning, ensure that the fans are spinning in the correct direction. Fans mounted incorrectly can cause improper airflow and lead to overheating.
d) Inspect for Damaged Components:
While cleaning, take the opportunity to inspect your components for any visible damage or signs of wear. Replace any damaged or malfunctioning parts promptly to prevent further issues.
10. Cleaning Laptops and Portable Devices
a) External Cleaning:
For laptops, tablets, and other portable devices, start with an external cleaning using a microfiber cloth to wipe away dust and smudges.
b) Keyboard Cleaning:
Use compressed air to blow away dust and debris from the keyboard. Tilt the laptop to allow gravity to help remove the particles effectively.
c) Screen Cleaning:
Use a specialized screen cleaning solution and a microfiber cloth to gently clean the screen. Avoid using harsh chemicals or abrasive materials that could damage the display.
d) Internal Cleaning:
Cleaning the internal components of laptops can be more challenging and may require partial disassembly. If you’re not confident in doing it yourself, seek professional help to prevent accidental damage.
11. Final Thoughts
A clean PC is not only visually appealing but also critical for maintaining top-notch performance and preventing hardware issues. Dust accumulation can significantly impact your computer’s efficiency, leading to a shorter lifespan and potentially costly repairs. By following the step-by-step guide and adopting preventive measures outlined in this article, you can confidently clean your PC without fear of damaging its delicate components.
Remember, regular cleaning and maintenance will save you time, money, and headaches in the long run. Make it a habit to clean your PC at least every few months, and your computer will reward you with smoother operation, improved longevity, and overall better user experience.
As technology advances, newer PC designs may become more dust-resistant, but until then, a little proactive maintenance can go a long way in ensuring your PC remains a reliable workhorse for years to come. So, grab your tools, take a deep breath, and get ready to give your PC the tender loving care it deserves!
Conclusion
Regularly cleaning the dust from your PC is a crucial maintenance task that ensures optimal performance and extends the life of your system. With proper preparation, the right tools, and careful execution, you can safely and effectively remove dust from your PC. By following the step-by-step guide provided in this article, you’ll be able to maintain a clean and efficient computer, minimizing the risk of overheating and hardware issues. Remember, a clean PC is a happy PC!
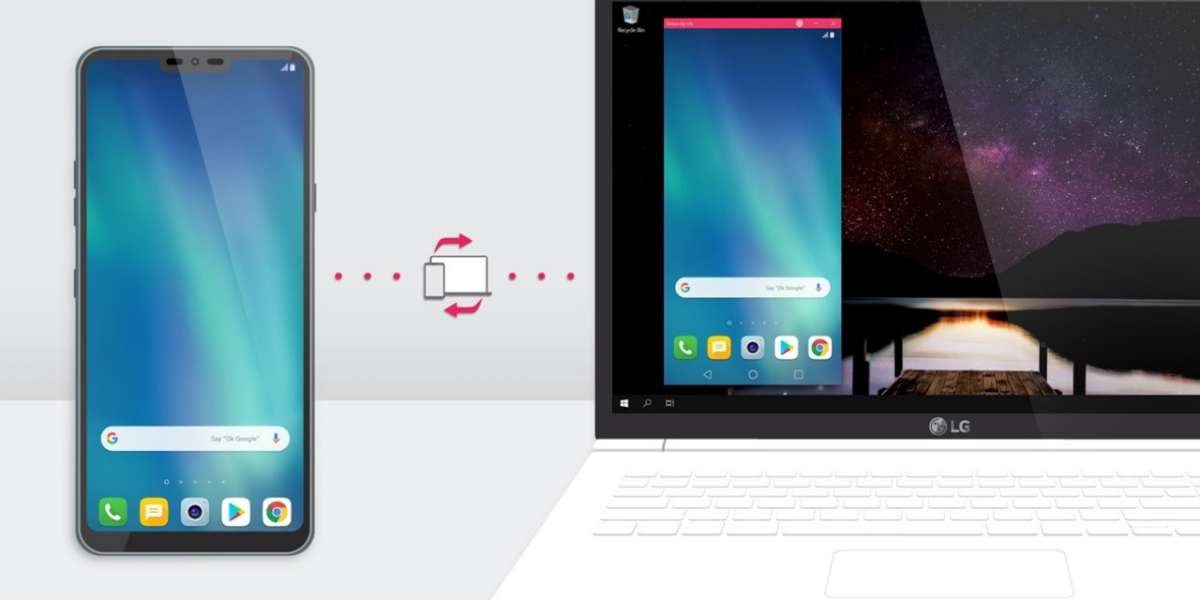
]]>1. Understanding the Basics
Before diving into the syncing process, it’s important to understand the basics of what syncing entails. When you sync your LG phone with your PC, you establish a connection between the two devices to exchange data seamlessly. This allows you to transfer files, update software, backup and restore data, and perform various tasks efficiently.
2. Preparing Your LG Phone
1. Enable USB Debugging:
To begin the syncing process, you need to enable USB debugging on your LG phone. Go to the “Settings” menu, scroll down to “About phone,” and tap on “Software information.” Locate the “Build number” and tap it repeatedly until you see the message “You are now a developer.” Then, go back to the “Settings” menu and find the newly enabled “Developer options.” Tap on it and toggle the “USB debugging” option to enable it.
2. Connect via USB Cable:
Next, connect your LG phone to your PC using a USB cable. Ensure that you are using a high-quality cable and that both devices are securely connected.
3. Syncing Methods
There are several methods to sync your LG phone with your PC, each with its own advantages and compatibility. Let’s explore some of the most popular options:
1. LG PC Suite:
LG PC Suite is an official software provided by LG that offers a comprehensive suite of tools to sync your LG phone with your PC. It enables you to transfer files, backup and restore data, update software, manage contacts, and more. To use LG PC Suite, follow these steps:
How to Turn On Voice Search on PC?
a. Download and Install:
Visit the official LG website and download LG PC Suite. Install the software on your PC following the on-screen instructions.
b. Launch LG PC Suite:
Once installed, launch LG PC Suite on your PC.
c. Connect Your LG Phone:
Connect your LG phone to your PC using the USB cable. LG PC Suite should automatically detect your device.
d. Sync and Manage:
Use the various features of LG PC Suite to sync and manage your LG phone according to your needs.
- File Transfer Mode: If you only need to transfer files between your LG phone and your PC, you can use the File Transfer mode. Follow these steps to use File Transfer mode:
a. Connect Your LG Phone: Connect your LG phone to your PC using the USB cable.
b. USB Connection Options: On your LG phone, swipe down from the top of the screen to access the notification panel. Tap on the USB connection notification and select “File Transfer” or “MTP” mode.
c. Access Your Phone on PC: Once your LG phone is connected in File Transfer mode, it will appear as a removable drive on your PC. You can then navigate through the folders and transfer files as needed.
4. Wireless Syncing Options
In addition to USB syncing, you can also sync your LG phone with your PC wirelessly. This provides convenience and flexibility, allowing you to sync your device without the need for cables. Let’s explore two popular wireless syncing options:
1. LG Bridge:
LG Bridge is another official software provided by LG that allows wireless syncing between your LG phone and your PC. To use LG Bridge, follow these steps:
a. Download and Install:
Visit the official LG website and download LG Bridge. Install the software on your PC following the on-screen instructions.
b. Launch LG Bridge:
Once installed, launch LG Bridge on your PC.
c. Connect Your LG Phone:
Ensure that your LG phone and your PC are connected to the same Wi-Fi network. Open LG Bridge on your phone and tap on the PC’s name displayed on the screen.
d. Sync and Manage:
Use LG Bridge to wirelessly sync and manage your LG phone.
2. Cloud Services:
Cloud services such as Google Drive and Dropbox offer seamless syncing across devices. By uploading your files to the cloud, you can access and sync them between your LG phone and your PC. Here’s how to use cloud services for syncing:
a. Sign Up for a Cloud Service: Choose a cloud service provider (e.g., Google Drive or Dropbox) and sign up for an account.
b. Upload Files: On your LG phone, install the cloud service app from the Play Store. Upload the files you want to sync to the cloud.
c. Access Files on PC: On your PC, visit the cloud service provider’s website or install the desktop application. Log in to your account and access your files. Any changes made on either device will be synced automatically.
5. Best Practices and Additional Tips
- Keep your LG phone’s software and PC’s operating system up to date to ensure compatibility and security.
- Use reputable antivirus software to scan your PC for any potential threats before connecting your LG phone.
- Regularly backup your LG phone’s data to avoid data loss during the syncing process.
- Safely eject your LG phone from your PC before disconnecting the USB cable to prevent data corruption.
- Explore additional syncing options provided by third-party software that may suit your specific needs.
In conclusion, syncing your LG phone with your PC opens up a world of possibilities, from file transfers to software updates and data backups. By following the step-by-step instructions and utilizing the various syncing methods available, you can effortlessly manage your LG phone’s data, ensuring seamless connectivity between your phone and PC. Enjoy the convenience and efficiency of synced devices, making your digital life easier than ever before.
]]>1. Understanding Quick Saving:
Before diving into the process, it’s important to understand what quick saving entails. Quick saving allows you to create a temporary save file at any point during gameplay without having to go through the menu system. It’s a convenient way to capture your progress instantly and safeguard against unforeseen events such as character deaths, crashes, or mistakes.
2. Default Quick Save Key:
Skyrim on PC assigns a default key for quick saving, which you can use to create quick save files. By default, the quick save key is the “F5” key on your keyboard. However, this key binding can be customized in the game’s settings if desired.
3. Performing a Quick Save:
To perform a quick save in Skyrim on PC, follow these steps:
Step 1: Ensure you’re in an appropriate gameplay situation where you’d like to save your progress.
Step 2: Press the “F5” key (or the customized key, if changed) on your keyboard. This action triggers the quick save function.
Step 3: Look for the notification in the top-left corner of your screen, confirming that the quick save was successful. The notification typically says “Quick Save Successful” or something similar.
That’s it! You have successfully created a quick save in Skyrim on PC. You can continue your adventure with the peace of mind that your progress is preserved.

4. Accessing Quick Saves:
To access your quick saves in Skyrim on PC, follow these steps:
Step 1: Press the “Esc” key on your keyboard to open the main menu.
Step 2: Within the main menu, select the “Load” option.
Step 3: In the “Load” menu, you’ll find a list of your available save files, including the quick saves. Quick saves are often labeled with the date and time of the save, making them easily identifiable.
Step 4: Choose the desired quick save from the list and select it to load the corresponding saved game.
How to Turn On Voice Search on PC?
5. Quick Save Considerations:
While quick saving is a useful feature, it’s important to consider a few factors:
- Quick saves overwrite previous quick saves, so it’s advisable to create a manual save file occasionally if you want to retain specific points in your progress.
- Quick saves are temporary and not as robust as manual saves. If you exit the game or encounter a crash, quick saves may be lost. Therefore, it’s recommended to regularly create manual saves for important milestones or achievements.
- Some mods or modifications to the game may affect quick saving functionality. Ensure that your mods are compatible with the quick save feature to avoid any potential issues.
Conclusion:
Mastering the art of quick saving in Skyrim on PC allows you to safeguard your progress at any moment and continue your epic adventures with peace of mind. Follow the simple steps outlined in this article, utilize the default quick save key, and enjoy the benefits of quick saving in Skyrim.
By understanding the concept of quick saving, knowing the default key binding, and following the steps to perform a quick save, you can ensure that your progress in Skyrim is always secure.
Remember, quick saving is just one aspect of maintaining your game progress. It’s also important to create regular manual saves, especially at significant milestones or before making important decisions. This way, you can revert back to a specific point if needed.
Additionally, be mindful of any mods or modifications you have installed, as they can sometimes affect the quick save functionality. Ensure that your mods are compatible with quick saving to avoid any potential conflicts or issues.
With the ability to quick save in Skyrim, you can confidently explore the vast landscapes, engage in intense battles, and immerse yourself in the rich storyline, knowing that your progress is protected.
So, embrace the power of quick saving in Skyrim on PC, and embark on your legendary journey through the fantastical realm of Skyrim with the peace of mind that comes from knowing your adventures are safe and sound.
1. Understanding Voice Search:
Before diving into the process of turning on voice search, it’s essential to understand what it is and how it works. Voice search is a feature that allows users to interact with their PCs using spoken commands instead of typing. The PC’s voice recognition software processes the spoken words and executes the corresponding actions. Voice search offers a hands-free and efficient way to interact with your PC, perform searches, open applications, send emails, and more.
2. Checking System Requirements:
Before enabling voice search, it’s important to ensure that your PC meets the necessary requirements. Most modern PCs come with built-in voice recognition capabilities, but it’s always a good idea to check if your operating system supports voice search. Additionally, make sure you have a functional microphone or headset connected to your PC to capture your voice accurately.
3. Enabling Voice Search:
The process of enabling voice search varies depending on the operating system you’re using. Here, we’ll cover the steps for the two most common operating systems: Windows and macOS.
Enabling Voice Search on Windows
To enable voice search on a Windows PC, follow these steps:
Step 1: Open the Control Panel: Click on the Start menu, type “Control Panel,” and select it from the search results.
Step 2: Access Speech Recognition: In the Control Panel, search for “Speech Recognition” and click on it.
Step 3: Set Up Speech Recognition: Follow the on-screen instructions to set up speech recognition. This may involve training the software to recognize your voice by reading aloud provided phrases.
Step 4: Enable Voice Search: Once speech recognition is set up, go to the Speech Recognition window, select “Set up microphone,” and follow the instructions to configure your microphone. Afterward, enable voice search by selecting the option that says “Enable dictation everywhere you can type.”

Enabling Voice Search on macOS:
To enable voice search on a macOS PC, follow these steps:
Step 1: Open System Preferences: Click on the Apple menu at the top-left corner of the screen and select “System Preferences” from the drop-down menu.
Step 2: Access Accessibility Settings: In the System Preferences window, click on “Accessibility.”
Step 3: Enable Dictation: In the Accessibility settings, select “Dictation” from the left sidebar and check the box that says “Enable dictation.”
Step 4: Configure Language and Shortcut: Choose your preferred language for dictation and set a shortcut key combination to activate dictation quickly.
Step 5: Enable Enhanced Dictation (optional): If you want to use voice dictation without an internet connection, enable “Enhanced Dictation” to download the necessary files.
4. Testing and Using Voice Search:
Once you’ve enabled voice search on your PC, it’s time to test and start using it. Open a text field or application where you can input text and activate voice search using the designated shortcut or by clicking the microphone icon, depending on the system. Speak clearly and give voice commands, such as performing a search, opening an application, or composing an email. The voice recognition software will process your commands and execute the corresponding actions.
5. Troubleshooting Voice Search Issues:
If you encounter any issues with voice search, there are a few troubleshooting steps you can try. Ensure that your microphone is properly connected and functioning. Check your PC’s audio settings to ensure the microphone is selected as the default input device.
If voice recognition accuracy is an issue, consider retraining the software by following the prompts to improve its understanding of your voice. You can also adjust the microphone sensitivity settings to optimize voice recognition.
If you’re experiencing network-related issues with voice search, ensure that your PC is connected to the internet. Voice search often relies on an internet connection for processing commands and providing search results.
In case the built-in voice recognition software on your PC doesn’t meet your needs, you can explore third-party voice recognition applications or virtual assistant software that offer enhanced features and functionality.
How to Get iMessage on PC without Mac?
Conclusion
Enabling voice search on your PC opens up a world of convenience and efficiency. With simple voice commands, you can perform searches, execute tasks, and navigate your computer hands-free. Follow the step-by-step guide provided in this article to enable voice search on your PC and experience the benefits of this powerful technology.
]]>1. Understanding SSDs:
Before diving into the installation process, it’s important to understand what an SSD is and how it differs from a traditional hard drive. An SSD is a storage device that uses flash memory to store data, offering faster read and write speeds compared to a mechanical hard drive. This results in quicker boot times, faster file transfers, and overall snappier performance for your computer.
2. Selecting the Right SSD:
When choosing an SSD, consider factors such as storage capacity, interface type, and form factor. Determine the amount of storage you need based on your requirements and budget. SSDs come in different form factors, such as 2.5-inch drives for laptops and desktops or M.2 drives that plug directly into the motherboard. Make sure to select an SSD that is compatible with your PC’s interface, which could be SATA, PCIe, or NVMe.
3. Gathering the Necessary Tools:
Before starting the installation, gather the required tools: a screwdriver, an anti-static wrist strap (optional but recommended), and the SSD itself. Additionally, ensure you have the necessary cables and connectors if your SSD doesn’t come with them. Refer to your PC’s documentation or the manufacturer’s website for specific information on the connectors needed for your motherboard.
4. Preparing the PC:
To install an SSD, power down your computer and unplug it from the wall. Open the case by removing the side panel, typically held in place by screws. Once inside, locate an available drive bay or the M.2 slot, depending on the type of SSD you have. Clear any obstructions, such as cables or brackets, that may be in the way.
5. Installing the SSD:
For a 2.5-inch SSD, attach it to an available drive bay using screws or brackets, ensuring a secure fit. If you’re installing an M.2 SSD, locate the appropriate slot on your motherboard, remove the protective cover, and carefully insert the SSD at an angle. Apply gentle pressure until it is firmly in place. Secure the M.2 SSD with the screw provided, if necessary.

6. Connecting the Cables:
After installing the SSD, connect the necessary cables. For a 2.5-inch SSD, use a SATA data cable to connect the drive to an available SATA port on the motherboard. Additionally, connect a SATA power cable from the power supply unit (PSU) to the SSD. In the case of an M.2 SSD, skip the data and power cables, as the connection is made directly through the motherboard.
7. Closing Up and Booting
Once the SSD is securely connected, reattach the side panel of the PC case and tighten the screws. Plug in the power cable and turn on your computer. Enter the BIOS settings and ensure that the SSD is recognized. If needed, set the SSD as the primary boot device. Save the changes and exit the BIOS.
How to Get iMessage on PC without Mac?
8. Migrating Data
If you’re replacing your existing hard drive with the SSD, you’ll need to migrate your data. This can be done using software tools specifically designed for cloning drives. Alternatively, you can reinstall your operating system and applications from scratch, ensuring a clean setup on your new SSD.
Conclusion:
Adding an SSD to your PC is a worthwhile upgrade that can significantly improve performance. By upgrading your storage to an SSD, you’ll experience faster boot times, quicker application launches, and seamless multitasking. With the step-by-step process outlined in this article, you can confidently add an SSD to your PC and enjoy its numerous benefits.
Remember, always follow proper safety precautions while working with your computer’s hardware. If you’re unsure about any step, consult your PC’s documentation or seek assistance from a professional.
By taking the time to understand SSDs, selecting the right drive for your needs, gathering the necessary tools, and following the installation process carefully, you’ll be on your way to enhancing your PC’s performance.
How to make Fence in Minecraft PC?
With an SSD installed, your computer will operate at lightning-fast speeds, providing a smoother and more efficient user experience. So, don’t hesitate to upgrade your PC with an SSD and unlock its full potential. Happy computing!